Saturday, July 31, 2010

Blast from the Past

Posted by Micah at 9:15 AM 8 comments
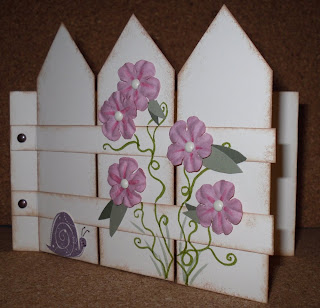
Here's a blast from my past... this is one of the first cards I designed myself (instead of just making what the demonstrator at an event made). It seems so long ago! I remember exactly when I made it too, it was at the Pincher Creek B&B scrapbooking weekend (my first and only, man I want to go back soooo badly!!). I scrounged the cardstock since I'd taken only scrap booking stuff to work on.

Garden Whimsey is the stamp set (I bought it after that weekend!) which is from Stampin' Up though now retired. I'm pretty sure that is Always Artichoke green in the background, then Almost Amethyst SU design paper and Barely Banana cardstock.

It's fun when you look back and go, "wow, I've come so far".

Edit to add: wow, I remember I used a hammer on the brads, that's why they look so squished.

Thursday, July 29, 2010

Scrap Day

Posted by Micah at 5:00 AM 8 comments
I hereby dub this Scrap Day. This is the day that you work on a project with nothing but scraps. That means you can't make a card base unless it's a left over piece that just happens to be big enough!!


Last week, before I headed out of town, I was working on a kids birthday card inspired by this card made by Libby. I was surprised at just how quick and easy it was to put together the faces!

See how cute they are?! My only pain is that I don't own the 1/2 circle punch (yet) and the 3/4 inch is too big. So I had to cheat and use Alphalicious cricut cartridge and cut out 12 letter i's. Oi! I'd hit "Cut" then "stop" once it was done the dot. (Er, I cut out 12, clearly, because I was doing TWO cards with three figures... hehe). I also need a sharper hole punch cause the one I have is cutting ragged circles.

At any rate, Koen was intrigued with my project and I dug out my scrap bin. I wasn't worried about cutting 1/2 circles for HIS eyes, he doesn't care. I put adhesive on the backs (I put the black dots on myself) and let him stick down the pieces where ever he wanted.


I think he kinda looks like Sid from Ice Age! Koen had fun making a few faces, which Kerowyn then colored for him.

Tools: SU Scallop punch, SU 1-1/4 circle punch (mouth), hole punch, cricut cause I'm too cheap to have already bought the 1/2 inch circle punch.

Tuesday, July 27, 2010

I'm sorry... with cricut

Posted by Micah at 8:15 AM 7 comments
Here's a card made entirely with a Cricut cutting machine. The cartridge I used comes with the Cricut (George and Basic Shapes) so a brand-new cricut owner can make this card easily!

I started with a 4.24x5 card base in Basic Black. Then I used some of my scrap card stock in Summer Sun, Only Orange and Real Rust to cut out @, # and & in both 1 inch and 1.5 inch sizes. I glued those down randomly (don't mind the still-wet glue in the picture!) on a 4inch chat bubble in Whisper White.

On the inside I did a couple more chat bubbles (1.5 and 3 inch I think) and a 1inch heart. I left the larger chat bubble blank but I'd wanted to stamp an "I'm sorry!" near the top (leaving room for hand written sentiment).

On a repeat of this card I think I might sponge the edges of the chat bubbles, red on the front and a soft pink on the inside.


Monday, July 26, 2010

Ronald McDonald House in Southern Alberta

Posted by Micah at 5:22 PM 0 comments
Did you know that Ronald McDonald House welcomes donations of CARDS and CRAFT supplies? I didn't! I do now though, and I've decided to see what I can do to collect materials and cards for the Ronald McDonald House Southern Alberta (that's cause it's in Calgary!).

My first question was, "what kind of cards? are they all 'get well soon' cards?" Nope! Any kind of card. A parent at a sick child's bedside doesn't need to worry about sending birthday cards or anniversary cards to friends and relatives, they should focus on being with their baby. What about birthday cards or thank you cards? Children's birthday cards especially!

My next question was, "what kind of craft supplies?" Well aside from kids crafts there is a need for scrapbooking supplies for families who find a way of coping with the stress by scrapbooking the experience.

So, do you want to contribute? I'd welcome your help! If you have any cards or supplies for donation please contact me at berkanaisageek(at)hotmail(dot)com. If you don't live in Southern Alberta there's a whole list of ladies accepting donations for other RMH locations over at Splitcoast Stampers!

Sunday, July 25, 2010

Custom Card for Warcrafter in Love

Posted by Micah at 8:00 AM 10 comments
Here it is, my first ever custom card! The request came from a woman who plays a Draenei hunter and is in a relationship with a fellow who plays a Draenei shaman in the game World of Warcraft.

Hunters use bows and shaman use totems. It was a lot of fun coming up with a template for a totem (each race has totems that look different). I used a chipboard parenthesis with waxy for the bow. For the "flame" around the fire totem I used white ribbon colored with a SU marker.

The tree embellishment is from SU Thoughts & Prayers and the sentiment is from CTMH Picture Perfect.

Obviously I couldn't post the picture until the woman gave the card to her love, so here it is... a month later! I'm happy with how it turned out (and I kept the template for the totem!) I just hope HE likes it too!

For more information on how to get a custom made card or craft of your own please check out my post detailing the process.

Saturday, July 24, 2010

Blogaversary give-away

Posted by Micah at 7:02 AM 0 comments

Woo! this is some SWEET candy! Thank you Gini for the chance to win... and the day after my birthday too!

Friday, July 23, 2010

World of Warcraft: More DoTs

Posted by Micah at 5:00 AM 7 comments
Last night my daughter, Elora, inspired another World of Warcraft card. You may recall the "I've Got the HoTs for You" card I did a while back. DoTs are the opposite of HoTs and her blanket was covered in them!

DoT stands for "Damage Over Time" and means a type of damage dealing spell that... well... does damage... over... time. The phrase, "more dots", is something a group leader might call out when coordinating 10 or 25 people to take out the same bad guy. (It's FUNNY because of a recording that was passed around the internet long ago that I won't link in my blog... but most Warcrafters will remember the "More Dots" clip).

DoTs are also usually fairly small amounts of damage, so the sentiment is funny... to anyone who plays a warlock at least.

All I did for this card is punch out 3 sizes of circles (3/4inch, 1-1/4inch and 2inch) from my scraps bin... essentially anything with a dot on it... and used my Creative Memories bubble punch on some of them. Then I started layering. I had some sticker letters to do the text and done! The longest process was punching out all the circles.

Since she was my inspiration (or at least her blanket was) here's a picture of my cutie. She was 2 months on the 21st! They grow up SO FAST!

She's so coy hehe.

Thursday, July 22, 2010

Kids Can Blog Too!

Posted by Micah at 5:01 PM 2 comments

Our morning routine involves getting the kids breakfast, making a pot of coffee and then Kerowyn and I head down to my computer. She sits on my lap and colors while I view check out my blog feeds in Google Reader (best invention EVER!). Kerowyn often comments on the blogs... especially if there's flowers; fairies; anything sparkly or... pets.

One of her favorites is Lucky Stamper because the image of Lucky is different (if not every day than close to it). The video below isn't from the morning but it shows how she responds none-the-less... the blog on the screen is Crafty Girl 21.

First WoW Card, revisted

Posted by Micah at 1:26 PM 1 comments
Some of you may remember my first ever Warcraft themed card... I've sent out and sold enough of them that I had to make more! This is a good thing. I always said that if I had to make more I'd adjust them a bit.

In the game, World of Warcraft, you can pick up and complete quests that earn you rewards. A character that has a quest is shown with a large yellow ! over his or her head. When you've completed the quest that person then has a large yellow ? over their head, letting you know to come collect your reward.

On the original design I'd put an exclamation point on the front and a question mark inside... because of how quests work and the sentiment I chose, it made more sense to do it this way.

I used Barely Banana paper with Summer Sun ink. The stamped sentiments are from Full of Life and Congrats. All products are from Stampin' Up.

Sorry for the dim pictures, it's horribly overcast today! I think the weather is a contributing factor to the series of unfortunate events that occured while making this card. Things I learned today include...
  1. Even if you have a seperate embossing tray for your black powder, it WILL contaminate all other powders. Your white will never be white again, even if you didn't open it during the same project as the black.
  2. It doesn't matter how careful you are... black emobossing powder WILL smudge.
  3. You really do need an embossing buddy, the other crafters aren't making it up.
  4. If you're having One of Those Days and something could go wrong? it will.


Hey look! Another one of those nifty detailed shots! Now I just need a photo box!

Happy Birthday - for a friend

Posted by Micah at 5:00 AM 4 comments
Calanthe wrote, "I would kill for a birthday card with that hedgehog on! He's so sweet, and my mother loves hedgehogs... :)" on my last blog entry. Well, she's my best friend so I can hardly deny her! But I assured her she doesn't have to kill anyone. Here are the fruits of my labours.

I used a Close to My Heart scrapbooking kit called "Miracle" which has made an appearance previously in one of my crafts. The irony here is that I'd originally made that craft FOR Calanthe but wasn't happy with the quality once I'd finished it.


Look!! I'm trying to take more creative photos... I keep seeing these nifty detail shots in other blogs. Mind you, I don't have a fancy photo box (where would I put it that the toddlers wouldn't get to it??) so I just use two pieces of cork. One on my desk, the other leaning against my monitor. You can usually tell if I've taken the photo at night since the natural light makes daytime photos more vibrant.

At any rate, as you can see I used two different sizes of dimentionals again so that the middle balloon is slightly higher. Loving this stamp set!! CTMH's "Happy Forever". The sentiment is from Stampin' Up's "Full of Life" (I use this stamp set SO MUCH!)

Wednesday, July 21, 2010

AAAH The Cute!! It HURTS!!

Posted by Micah at 8:26 AM 9 comments
Aaaah! the cute!!! it hurts!! I found this template over at SCS being used for a "Date Night" card. Thank you Janelle, very sweet!! I decided it was time to make something for the Grandparents to commemorate the birth of my third baby, Elora Dawn, and this card works perfectly!!

Instead of adding a spot for tickets I left much of the card blank (I'll be adding Elora's "stats" now that photos have been taken). The CD itself will hold ALL of the pictures and video that I've taken of Elora from her birth to the day I mail out the cards.

I used the CTMH stamp set, "Happy Forever", and I mean I literally used all the images (I didn't use the tiny heart and two of the three sentiments). I used my SU watercolor pencils to color the little guy... when I make the second one I'll use proper watercolor paper for the CD "sleeve" since I found the cardstock I did use didn't react well with water, limiting how much blending I could do.

For the front of the card I used two different sizes of dimentionals (SU and dollar store stuff) so that the middle balloon pops just a little bit more. The kite is also popped off the page.
I used an extra piece of cardstock on the back to cover the ribbon because it's the type that adhesive goes kind of "through" and I wanted to make sure the ribbon wouldn't fall off. (Don't mind the block over my email address, or the shadowing on that stamp... oops!)
I'm super happy with how it turned out and I'd definately use this template and this stamp set again.
Now to get crafting on the second one!! Thanks for stopping by!

First sketch attempt...

Posted by Micah at 7:32 AM 4 comments

I'm very much not impressed with myself. I follow Hand Stamped Sentiments (among others) and they posted a sketch challenge (HSSSC25). One of the reasons I've not entered one before is that they often require all or a high percentage of one vendor or another and well, my craft room is not as well stocked as some.

I used left overs from the card I made yesterday and broke out a CTMH stamp set (the name of which I can't find on the package, doh) and the SU retired background French Script. Oh and the "merci" comes from the SU set called... Merci. I used a resist effect for the heart, stamping first the "merci" then using versa mark to stamp the heart overtop... and sponging the Rose Red ink overtop.

I'm going to enter the card anyway... but I don't think I really captured the essence of the sketch. I'm not discouraged though!! I will enter another one!

Tuesday, July 20, 2010

Stepping outside...

Posted by Micah at 7:44 AM 8 comments

Now and then I try and step outside my "comfort zone" and try something new. Embossing isn't new, but for me working with patterned paper kinda is. Using more than one kind of patterned paper is even harder for me! I'm also not usually the type to use paper flowers or buttons without prompting... I finally got over that hurdle with ribbon though.

If I were to do this card again I think I might do the children in white emboss instead of gold. Without the light from the flash on it the gold sort of blends into the patterned paper... on the other hand it does make a neat effect when you hold the card and then the light hits it suddenly POPPING the children out at you.

I used CTMH "Childhood Portrait" and SU "Live Like You Mean It" along with random scraps in various project boxes. I mean I literally opened up Kerowyn's baby book project box and pilfered the ribbon and flowers. It was a late night card hehe.

Monday, July 19, 2010

Birthday Boy

Posted by Micah at 9:43 AM 8 comments


My nephew Aidan is turning two at the end of the month, he's getting so big! I made this card from a template from A Path of Paper blog. So much fun to make and super easy!

I wanted to keep this one fairly simple so I didn't use anything but the base cardstock (in one of the many blues from Stampin' Up, I can't tell which one heh). I used Night of Navy ink to darken the edges of the overalls and pocket so they'd stand out a bit and to add smudges... cause boys are dirty! Always dirty!

The stitching is just a white marker and the "a" is a rub on. I'm pretty happy with how it turned out (though next time I won't do it when my toddlers are up so I can get my stitching straight! gah!).

Hopefully Aidan likes it too!

Sunday, July 18, 2010

Stampin' Ten Group

Posted by Micah at 7:18 PM 4 comments


I have the pleasure of being part of a Stampin' Up group where we meet once a month and promise to spend a certain amount of money and trade off who gets to take home the hostess benefits. On those monthly gatherings our Stampin' Up demonstrator shows us several projects and techniques. It's great fun, it'd be great fun without all the other stuff just for a chance to get out of the house without the kids!!

I'm posting the cards we made. These are made entirely of Stampin' Up product (all current) and tools... oh maybe the adhesive wasn't Stampin' Up heh. We used tons of embellishments and techniques but all were super easy and super fast! (Note that these were not designed by me, and the demos looked way better than mine cause I like to switch around details a bit lol).


Tonight we did three cards and a "stages" scrap book page (which is a 6x6 on an 8.5x11 on a 12x12).

Saturday, July 17, 2010

Blog Candy (and Contest) Blog

Posted by Micah at 3:12 PM 2 comments
Tons of people are posting blog candy and contests on their blog and I'm all over the place trying to find my way back to them!! Because I can be a leeeetle OCD I figured I'd make a place that me and my friends can keep track of (and help spread the love) blog candy and contests.

So without further ramblings I present you the Blog Candy Blog!
Right now it's just me maintaining it, and since I'm just starting out there's a TON of initial posts (sorry Google Readers!!). Recurring draws are found in the side bar (weekly and monthly).


I'm looking for a couple dedicated crafters who are interested in helping keep the posts coming, if you think you might be interested in finding and posting about blog candy, let me know!! There's no need to go out of your way to find the blog candy, but when you do you'd just make a quick post on the Blog Candy blog (checking first to be sure it's not a duplicate of course).

Friday, July 16, 2010

Swap Owl!

Posted by Micah at 12:14 PM 4 comments
Well I joined a swap... and it's a punch art swap. I was going to create a new punch art character (working on them!!) but I had requests for the owl that Colleen Hilchie showed me how to do. I wanted to use up some of the retired pinks and purples from Stampin' Up and to challenge myself to work with colors I love but seem to have no luck working with! I'm pretty happy with the results!


So here it is! A sneak peek for those participating in the swap. I did something different this time, I made the wings mobile! I think moving bits on cards are really cool and fun. It means using more embellishments and dimentional tape, but I'm okay with that. Hey, I could teach my owl how to use semaphore flags!


Stampin' Up materials used: paper (sahara sand, some pinks and purples that I'm sure are retired, very vanilla), ink (perfect plum), stamps ("Sprinkles") and punches, (tag, scallop circle, trio flower, circles and trio heart).

Close to My Heart materials used: stamps ("A Little Buzz" and "Hodgepodge Alphabet")

Other materials used: ribbon, itty bitty brads, creative memories corner punch

Thursday, July 15, 2010

Scrapbooking, I do that too!

Posted by Micah at 1:48 PM 1 comments
I've been working on little 8x8 scrapbooks for my kids and my nieces and nephews... it's slow going! The books are titled, "People Who Love Me", and are meant to be looked at and loved by little hands. Each two page spread is another person (or couple, Auntie and Uncle together for example) with a photo of that person or people (preferably with the child the book is for) and a paragraph or two message from that person.

Here's one of the Grandpa pages I did, minus photos. (Sorry for the glare on the "Pride&Joy" sticker). I'm having a harder time doing the more manly pages and an even worse time making "gender neutral" pages for Auntie/Uncle combos!
Maybe soon I can actually start putting pictures into the books!! Thankfully I have a monthly crop night (bring your own project and just hang out) that allows me time to dedicate to this bohemoth!!

Three kits, three choices

Posted by Micah at 8:04 AM 3 comments
A while back I posted about Teresa Collin's Stampmaker machine, really cool! Since then I've done some research and found that this machine is already on the market (I'm the last to know these things far, far, too often heh). Not only that but there's three different levels of stamp making kits.

First up is the $39.95 US kit from Photocentric called StampIt which is designed for people only intending to make a few stamps. The quality is not as high as the premade stamps you'd buy at the store or from a stamping company. It's perfect for creating a family project. The process takes about 25 minutes per stamp and it uses a regular 60 watt bulb from a standard lamp.

Next up is the same machine as the TC Stampmaker, you can either get the Stampmaker Essential forr $139.99 US or the Stampmaker Complete, which comes with an inkjet printer, for $189.99 US. The printer is important since the images you print have to be super, super, dark to prevent light from going through in certain spots. These two kits are great for folks who want to make a few more stamps and want to speed up the process (5 minutes per stamp). From what I understand the quality of the stamps produced are a bit better than the StampIt kit. This option is probably best for the avid crafter planning on making stamps for personal use.

After that is the kit you'd use if you were planning on going into production for your own stamp line. The Imagebox kit goes for $379.00 US and the time to make a stamp goes back up to 25 minutes, however the quality is much higher and you can do a full sheet (8.5x11) of stamps at the same time.

Very exciting! When do I get to win the lottery?!

Wednesday, July 14, 2010

Love Bug

Posted by Micah at 9:30 AM 3 comments
Well, I like the idea but I'm not sure I'm happy with the result. My son (who thinks I'm Mister Maker's apprentice or something) asked if I could make him a worm. So I started playing around with some left over circles and thought it would be neat if they could still move when on the card.

The base is SU Barely Banana, the other colors are Certainly Celery, and I think Old Olive and Always Artichoke (I was using scraps). The images are stamped in Chocolatel Chip.

As you can see, the worm DOES move... that's a heart for a mouth, Koen's suggestion. I used itty bitty brads to link the circles and only glued it down by it's "butt". I think it's something I'll revisit... but this one gets tossed in the "Samples" box. Heh.

Tuesday, July 13, 2010

Onsie Cards by Lauren

Posted by Micah at 10:16 PM 2 comments
I don't know why I'm making so many baby cards!! Maybe because Elora is still only an itty bitty thing. Well tonight I decided to use "Event Full" before I give it away and when I saw the Onsie card by Lauren Meader I just knew that was what I would make.

I used Sahara Sand and Certainly Celery for the paper colors, mostly because I have way too much Sahara Sand and need to use some up! I restamped and cut out the peas to give them a little bit of pop.

For the girl onsie I used Very Vanilla and Regal Rose (with a touch of Blush Blossom for accents on the Ewe). The Stamp Set is from Stampin' Up as well, it's call "Pun Fun".

These were super easy to make once I got it down. I didn't use the same size circles as Lauren simply because I don't have as many punches (yet!) as others... but I think it worked out in the end. If I make these again I'll have to get some teeny buttons like Lauren did for the snaps at the bottom! Thank you for a great card idea Lauren!

Monday, July 12, 2010

Another Give-Away!

Posted by Micah at 7:27 AM 21 comments
Time for another draw!

Congratulations to Theresa, Jenny and Ann!!

Theresa said...
Thanks for the chance to win such great blog candy. I have become a follower and have liked you on Facebook.
Theresa in Kitimat

Jenny said...
Fun giveaway!! I'm a follower and I will like you on FB!

Ann Crowe said...
I'm dancin on yur comments page! /dance

Commented, posted, liked and followed! We're on a roll!


Theresa, once you let me know which three cards you'd like I'll whip em up and mail em out!
Jenny, I'll be in touch with the details on how to claim your gift certificate from Leisa!
Ann, I'm sure we can arrange a speedy delivery of your new stamp sets!

We only reached 30 followers this go around so my super secret prize carries over to next month's draw. Spread the word!

Thank you to everyone who participated in my give-away!! Check back again next month to see what else I'm willing to part with!

Prizes include:
- 3 cards of your choice. If I've posted it on my blog and you want it, you got it!
- $20 Gift Certificate for Close to My Heart from my very own dealer (and soon to be upline) Leisa Hubley!
- The "gently used" stamp sets from Stampin' Up called "So Many Sayings" and "Event Full". Both of these stamp sets were hostess gifts, so you couldn't get them without hosting a party and now are no longer offered as options! (Scroll down to see pictures of both stamp sets)

Here's how to enter...

Edit to add: Don't forget to comment if you "follow" the blog or "like" the Facebook page!

1. Comment in reply to this blog entry.

2. Followers of my blog who reply to say they wish to be entered are actually entered twice! (make sure to tell me in your reply that you're in my "Follow" list so I don't miss it!)

3. "Like" my page on Facebook (there's a "Find us on Facebook" link on the right hand side of my blog) and comment here to let me know and you're entered again!

4. "Share" my blog on your blog or on Facebook and comment here to let me know you've done that (if you have a blog AND Facebook that's two more entries in the draw!) make sure to leave a link in your comment!!

That's four OR MORE ways to enter!!

The draw will be on July 24th, so entries up until July 23rd 9pm mountain time will be accepted!


SURPRISE! If my "Followers" reaches 100 people there will be a fourth surprise draw! So tell your friends!!

Oh my goodness!!

Posted by Micah at 7:02 AM 0 comments
Well I may be a few days short, but oh my goodness...

Teresa Collins posted on her site a few days back about her soon-to-be-released (drat I missed the draw!) Stamp Making Machine. That's right... a machine that makes your own stamps from your own images, acrylic stamps at that!

From what I'm hearing the machine will retail at $169.99 (it was unclear which dollar that was in) with consumables potentially being as low as $1. I've also heard that you do not need to hook this machine up to your computer... however you'll still want to have a way to print your images (unless you're hand drawing them of course). What I can see if the picture it looks like one of those salon nail drying machines. Funky! Teresa has said she'll include a few of her own images to get you started right "out of the box". Creating a stamp only takes about 5 minutes. Wow!

Sunday, July 11, 2010

And the Winner is...

Posted by Micah at 8:13 AM 0 comments
Today is the day I announce the winner of this draw, my first ever give-away!! I thought it would be clever to take photos of my children drawing the names from the bucket. First up is Koen. Have you ever tried to explain to a three year old to take ONE piece of paper from a bucket? After he got the "just one" part down, he didn't understand what the big deal was about a piece of paper, so he promptly dropped it on the floor.

So... sorry Celtica while you won the stamp set, my son showed a blatant disregard for your victory! Congratulations! I will make sure you get this stamp set ASAP, which I think will be next Tuesday since you're coming over. You can have a chat with Koen about his lack of respect then.

Next up was Kerowyn... cause anything her big brother does she has to do too. Explaining to a two year old the concept of "just one" turned out to be easier, but she felt the piece of paper would be better served shoved in the gap in my cabinet behind her (while Koen looked on the floor for Celitca). Ah well, I did manage to rescue your piece of paper, Leslie, so congratulations! You've won three cards of your choice!

This has been a lot of fun and I hope to do another give-away soon. Thank you so much for everyone who showed their support and entered. I've learned a great deal... like don't put your draw date too far away, and have your husband do the draw not your kids.

Once again, congratulations to Celtica and Leslie, our winners!

Thursday, July 8, 2010

Casket Treat Box

Posted by Micah at 2:06 PM 0 comments
I found this Marth Stewart Template for a Casket Treat Box a while back and told myself I'd wait until closer to Hallowe'en to make it. Partly because I don't have any Hallowe'en related stamp sets other than one "Happy Halloween" from the All Holidays stamp set from Stampin' Up. The top caption reads, "Life. Make it Count."


I used Sahara Sand paper because I have far, FAR, too much of it and need to use it up. Besides, doing three dimentional projects is easier with proper cardstock instead of patterned paper! Aside from "All Holidays" I used "Make it Count" also from Stampin' Up. The other colors are Summer Sun, Pumpkin Pie, Basic Black, Bravo Burgundy (text), and Creamy Caramel (sponging). I'm so happy to find a use for Creamy Caramel, it's one of the few colors I've never used before! The project measures 6 inches long by 3 inches wide (at the wide point) by just under 2 inches tall. It's big enough to be used for pencils or small toys.

This one is for you Colleen G. I know how much you like Hallowe'en stuff and it was your recent birthday that inspired me to make this early!

On a totally related note, my 3.5 year old son was watching Mister Maker (what? T.V. is how I can make a craft during the day, don't judge me! hehe) while I was making this project. He said, "Mommy, what you doin'?". I replied, "I'm making a box, honey". He pondered this a moment and nodded, "mommy, you misser maker," and returned to watching his program. I am excited to know I have reached such heights of esteem in my son's mind. *snerk*

Information on Commissioning a Custom Piece

Posted by Micah at 10:08 AM 0 comments
Recently I've had the pleasure of getting several requests for custom work! (I'll be able to post the results after the people who commissioned me give the project to the people it's intended for, don't want to risk folks seeing their presents early!)

Since this might be a recurring situation I wanted to post with details on what happens during the commission process.

Step One: you contact me and make a request. You can be as specific or as vague as you like. "I want something with flowers on it," or "I want a card orange flowers, purple polka dots on the flowers and a green background, it has to have 3 pearl accents somewhere too".

Step Two: we communicate. I tell you if your request is reasonably something I can complete or I offer suggestions on how it can be modified. We keep up this communication until either you are happy with the idea or we realize that I cannot meet your expectations.

Step Three: Assuming we've come to an agreement instead of parting ways, we discuss price. Price is based on the materials I use and the time it takes to make the craft. The more "stuff" you want on your project, the longer it will take to complete and the higher the price. A card costs less than a two page 12x12 scrapbook page. Because it's a custom commission the price is something you can control, it may mean going back to step two. That is up to you.

Step Four: With the idea and price now set I begin work on the craft. I'm happy to take photos during the process and send them along so you can see where I am... but the more often I do that the longer it takes to make the project!

Step Five: The project is complete, payment needs to be made (you are paying for shipping so I can't send it without payment!)

Step Six: Payment is made so I send the project. I will make every reasonable effort to ensure it is not damaged (for example packing a scrapbook page with a piece of cardboard to prevent accidental bending of the page, and writing "please do not bed" on the packaging) but if the mail service causes damage I cannot be held responsible.

And that's that! I always ask that I be given permission to post a picture of the finished commission on my blog to showcase my skills, but I don't do so until you've told me it's okay just in case your commission is a gift.

Saturday, July 3, 2010

Gate card

Posted by Micah at 12:33 PM 0 comments
After seeing this post I decided to make one of these cards. It was really easy to make! Instead of using Whisper White I used Very Vanilla because the vanilla cardstock is a bit thicker/sturdier. I sponged the edges with Creamy Caramel classic ink from Stampin' Up.

The little snail is from a now-retired stamp set called Garden Whimsey, also from Stampin' Up. The vines are hand drawn with Garden Green and Old Olive markers.


The inside of the card reads, "Thanks... not just for the BIG things you do, but all the wonderful little things too!" and is from the stamp set "Full of Life" from Stampin' Up.
Super easy to make, and looks fabulous!
 

Stamp Off, Eh! Copyright © 2011 Design by Ipietoon Blogger Template | web hosting