


Popular Posts
-
 Time for another draw! Congratulations to Theresa, Jenny and Ann!! Theresa said... Thanks for the chance to win such great blog candy. I hav...
 -
Now that I've got my craft area mostly settled after the move (almost a year ago *facepalm*) I've been thinking about the next blog ...
-
 So it's not paper crafting, but it's something I tried out and it is a crafting project! I read about making wool dryer balls on a...
 -
 Well, I've been working on a few non-crafty projects and so have neglected to post here in sometime. Thank you for the kind emails and t...
 -
 Done! It's been a blast working on this piece, the person who commissioned me (name withheld in case the person who is getting the card...
 -
 I have a really hard time working with pink. Those of you who knew me when my first daughter was born know that I really don't like pink...
 -
 More Christmas stuff?? Don't worry, we'll be starting in on Valentine's Day soon! I fell in love with that broad ribbon a month ...
 -
It's been several years since I posted here and it's time for an update I think. Over the years I've moved (still in Calgary),...
-
 Some more World of Warcraft cards! In the game when you hover your mouse over an object that you can interact with the cursor changes into a...
 -
 I fell in love with Close to My Heart's " Dimensional Elements: Ornaments " (no word of a lie, I bought 4 packs!). You get six...
Friday, January 28, 2011
Away Notification!
I'll be on a posting hiatus until after Valentine's day. When I'm back to posting we'll dive into the exciting world of dry emboss! Woo!
Tuesday, January 25, 2011
Sneak Peek! "Aspire"
 Well I may not have liked how the original card looked from my card swap (see previous post for remade card) but I still really liked how the base looked. It just needed another image.
This stamp set is called "Aspire" and will be available in one more week! It has three dancers in different poses, two flourishes (one with the word Aspire) and two phrases. "Dance as if no one is watching," and "If you don't leap, you'll never know what it's like to fly."
I used the Wings paper pack with Juniper ink, the dancer is done in Desert Sand. I topped it off with some wide satin ribbon and some bling.
Thank you to Leisa for taking such a nice photo of the card!
Saturday, January 22, 2011
Remade card
 I wasn't happy with how my card from the Heat Emboss Resist post turned out, so I changed it up a bit. I switched out the ribbon and the design paper and then my upline, Leisa, took a really nice picture of it for me!
This also happens to be the card I'm using for my part in the "Thank You" card swap I'm hosting! Typically a swap is "5+1" or "7+1" where you make 6 cards, or 8 cards, but get one less back. The extra card is kept by the hostess. In the case of this swap the extra card is joining the donations going to the Ronald McDonald House here in Calgary, Alberta.
I'm really happy with the changes. I'm using Juniper, Sweet Leaf, White Daisy and Black as my colors and the design paper is from the Wings paper collection. The stamp is from Find Your Style, this month's Stamp of the Month.
Thanks for checking in!
Friday, January 21, 2011
Embossing Day Three: Bleaching
 Yes, bleaching. You can use bleach while crafting, for many purposes, but this one is one of my favorites.
A few tips before I begin. Wear clothing you don't mind getting dirty or ruined, just in case, bleach is not the same as washable inks! Also, don't work in a small windowless room, it's still BLEACH.
Not all cardstocks work well with bleaching, I suggest testing a corner of the cardstock you want to use (you can still use the other side of the paper). The best kind are the "full bleed" type cardstocks, not the "white core".
 I picked three pieces from my scrap bin and, using the Heat Emboss Basics, I heat embossed my image in detail clear. You can use a color embossing powder too, the stamp I was using had a lot of tiny detail and I wanted the color of the paper to shine through.
Once the emboss dried (it doesn't take long) I used a paint brush to spread a little bit of bleach over the areas I wanted to draw attention to. I needed several coats on the baby images. Tip, if it's not going light enough, fast enough, try applying a little bit of heat with your heat tool while the bleach is still wet. Daub with a tissue to take off excess bleach if you put it on a bit thick.
I wasn't really thrilled with how these turned out, I mean, they look great but I couldn't get "into" making a card with them... so they've been added to my decorative scraps collection and may get made into something later.
Thanks for checking in!
Thursday, January 20, 2011
Valetine's for Charity
 Wow have things been a whirlwind around here! First we all got sick (poor Koen had to miss his friend's birthday party and he was NOT happy about it) then we found out we'll be moving at the end of our lease as the owners would like to sell the house (we would buy but it's a house we'll outgrow in a year or two). So I haven't been posting much as crafting has been limited.
Last night, however, was my monthly "meeting" with my upline Leisa. (We put on reruns of Glee or CSI and papercraft... sometimes with new product). Leisa gave me a HUGE bag of Valentine cards for the Ronald McDonald House that I collect for and I made a few more.
This card uses red cardstock that a friend gave me that was recycled from a closing business, two punches and treat cups from Stampin' Up, and the sentiment is from Clost to My Heart, a stamp set called "A Little Everything".
I wanted to thank everyone who has given me cards to include in the donation drop. As soon as my currect "Thank you" card swap is concluded I'll be taking the whole lot of them in.
Blog Award
Well, I would like to thank Anne Marie for awarding me with the Stylish Blogger Award! Anne Marie has a fabulous blog, she's got an eye for details and it really makes a difference in her projects. Thank you, Anne Marie, for thinking of me!
 The rules of this award are simple:
 The rules of this award are simple:
- Thank the person who gave it to you and link to their blog (done)
- Share 8 things about yourself
- Share the award with 8 other "Stylish Bloggers" and share the bloggin' love.
Well... 8 things about me. I'm not even sure what I shared last time I got one of these, so if there's any repeats, please don't be angry!
- I play World of Warcraft. Actually... my husband and I play World of Warcraft. With my mother. And some of my nephews. And my sister plays now and then. Even my 4 year old knows how to make a character move around and jump in the game! I was playing while in labor with my second baby (the doc said "go home and do something relaxing" so I did!). I was playing 12 hours after my third was born (for those who play, we got 6/12 in ICC10 before Cataclysm came out).
- I love creative writing but most of my writing (that I publish to the web) is based on role playing games that I've played... so World of Warcraft, Dungeons and Dragons and Vampire: The Masquerade.
- I'm very outgoing and creative, I really enjoy "story telling" or "running" the games mentioned in the above point. Think of it like a narrator in a TV show, but the narrator has control over what the "extras" say and do. The "main actors" are other people playing made-up characters and making their own choices. It means I have to be ready for ANYTHING! I love it!
- I plan on home schooling because if I'm going to pay for "free public education" I might as well do it myself and at least know what my kids are learning! I'm very grateful that I'm able to do this and hope that our circumstances don't change so I can continue to do so (Koen starts kindergarten this year!!)
- I'm really nervous about hosting my first monthly stamping group. I've been a consultant with Close to My Heart for four months and I've only co-hosted one card making party... now I'm hosting a monthly group. Panic!
- I hate eating ice cream or pudding or cake with crunchy bits like nuts. I want to mush the ice cream to the roof of my mouth and I can't if there's walnuts in it!
- I never drink enough water. I really should to get myself more hydrated... but, it's so much water!
- I'm really bad at thinking up things to share about myself.
So now I'm to pick 8 people out of the hundred or more blogs I follow to award this to. Wow!
- Starla with StarFireEtc. She's just starting out in the blog-o-sphere and has some absolutely amazing photos. Very striking. She also dabbles in papercrafts. And... she's one of the nicest people I know, I'm glad to be able to call her my friend.
- Okay, I know I've picked Leisa with Big Red Scraps before, but she's my friend and my upline and I know she's posting an amazing card today. She's also the founder of the CTMH community with the same name, Big Red Scraps.
- Colleen with DragonflyInk Creations also has some pretty amazing stuff, and also happens to be one of my best friends.
- Kathy Braun with Lucky Stamper is not someone I know "offline" but I wish I did. She's always got a kind, and sincere, word. Her dog is really sweet too and Kerowyn just loves him to pieces without ever having met him.
- Twyla with Tywla's Heart is still relatively new to me but I'm enjoying participating in her many swaps and seeing the projects she posts on her blog.
- Jodi with My Creative Expression has a really nice blog too, I always enjoy checking out what she's posted.
- I always notice Frances with StampOwl. It may be that she shares my first name, but I think it has more to do with the really great cards she posts!
- Stephanne with StagnantlyCreative is also new to me, but her style is fabulous! She goes for an older vintage style, but the images (in her last post, for example) aren't the kind I would think "fit", and they totally do!
Okay, goodness, that took a long time. I think I might follow a few too many blogs. But I can't unfollow any of them, they are all too great!
Thanks again, Anne Marie!
Thursday, January 13, 2011
Valentines for Charity
Next month is Valentine's day and while some of us older folks are a bit jaded toward another Hallmark occassion, there are a lot of sick little kids at Ronald McDonald House Southern Alberta that would absolutely love to give and to get a Valentine. Since many of them are bed ridden they don't have an opportunity to make a card for mom or dad or siblings, and certainly any parent glued to a child's bedside doesn't want to take time to pick out a card at Walmart.
Normally I would do this as several different swaps over several different websites, but I waited too long so I'm asking for donations instead.
If you're willing to donate a Valentine card or two please email me at ruth(at)stampoffeh(dot)com for my address.
If anyone would like more information on adopting a Ronald McDonald House in your area (to coordinate cards and crafting supplies being donated) let me know, I'm happy to help get you started!!
Thank you!
Ruth
Tuesday, January 11, 2011
The Hamburger Cupcake
 I've seen these hamburger cupcakes on various places around the web and I promised I'd make them for Koen's birthday. Some of you may recall Elmo and Cookie Monster cupcakes from this summer, which were a total hit. The hamburger cupcakes were easy in theory but I learned a few things that would have made it easier had I known them in advance.
For instance, you want really small cupcakes. Like, less than 1/3 of the cup small. (The package says to fill the cup with batter to 1/3, yeah, no). And you want really thin brownie, I ended up splitting my "paddies" in half!
 This all makes more sense if I explain the hamburger cupcake. Bake cupcakes with yellow cake mix. Bake brownies and use a circle cookie cutter to make your burger paddies. Slice baked cupcakes in half horizontally to make your bun. Add yellow, green and red icing on top of your paddy for condiments. For an added touch you can sprinkle sesame seeds on the top (to make them stick moisten your finger and run it over the top of the cupcake). I opted to draw each child's initial on the top of the burger instead.
 I also learned that it's actually best to make your "ketchup" kind of runny because kids think it rocks when the icing pours out the side of the burger.
I know they were a hit because every family member Koen spoke to after the party had the same conversation with him...
Family Member: Happy Birthday Koen, did you have a nice party?
Koen: Thank you. We had CUPCAKES, and it was a HAMburger! It was COOL! And there were bababalooons!!
So while they didn't turn out as "pretty" as the hamburger cupcakes I've seen around the web, they turned out just right for my 4 year old. Now to come to terms with being the mother of a 4 year old!!
Thanks for checking in!
Monday, January 10, 2011
Embossing, Day Two: Resist Embossing
 Welcome back! Today I'm going to go over an embossing technique that uses heat emboss from the previous post.
To start this project you need the usual suspects of paper, ink, and stamps. Look for a stamp that has lots of surface to it, not something that is nothing but itty bitty lines. For the embossing portion you'll need "detail clear" embossing powder, versamark pad and your heat tool. You'll also need a brayer, or a sponge, or some other means of covering large areas with ink.
 Start off with a light color paper, I picked White Daisy because I'm making a card with the Wings paper pack. Stamp your image a couple times (I picked the butterfly and the word "Soar" from this month's Stamp of the Month, "Find Your Style") and cover in your powder. Tap off the excess and apply heat from your heat tool. Take the time to shine a bright light (or just hold it up to the light) on your paper to look for "dull" spots, that'll be spots that the heat tool didn't quite melt all the powder.
Next apply your ink. I'm not adept at using a brayer so mine came out a bit uneven, I typically use a sponge or even run the ink pad over the paper (careful with this one though, if the ink pad is fairly "juicey" it could oversoak your paper!). Edit to add: Because the embossed image is glossy it doesn't "hold" the ink... this is the "resist" part of the resist emboss!
Now I've got white butterflies on Sweet Leaf green paper!
Hint: you can use patterned paper to end up with patterned butterflies on a darker paper (in that case you'd have to use ink dark enough to hide the pattern).
 But wait, there's more!! For three easy payments of... no, wait that's not right.
Let your paper dry completely, I mean REALLY dry... and stamp your image again in some of the larger "blank" areas. Apply your powder (this is why it has to be dry, or your powder will stick where you don't want it to) and heat and now brayer or sponge a darker color! I used Juniper, again to coordinate with the paper pack I'm using.
 So how cool is that? You now have two sets of your image... white and green.
I did a third layer using black ink for the final bit. Experiment with it. Use your lighter colors first. See how the first butterfly seems to be "on top"?
Tip: if you find that the ink is staying on your image (such as when you sponge) just rub it gently with a very slightly damp tissue or a nearly dry baby wipe. That will take the ink off your embossed image without damaging your paper.
I've done this sort of resist emboss technique before. In that case I stamped a word in a dark ink and then stamped over it with the embossed image and sponged another color over that... leaving the word visible like through a window. My friend Colleen showed us that one, loved it!
 Here's one more example of resist. This is a 6x6 layout I made for a consultant swap. The dress form on the left is detail clear, I used white daisy pigment ink to give that smokey look around it before adding a flower. (Sorry the sentiment can't be seen, poor lighting where I was taking pictures!)
Remember that your pigment based inks (like black and white) will stick to your previous layers a bit more, you'll need to clean off the embossed image before the ink dries too much.
Thanks for checking in, I hope you enjoyed today's embossing technique. Please, if there's a particular embossing technique you'd like to see, comment! I certainly don't claim to know about ALL of them and I'd love to learn about new techniques!
Wednesday, January 5, 2011
Embossing, Day One: Heat Emboss Basics
 There are tons of embossing techniques, I'm sure there are plenty I don't know about. There are a bunch of tools too, from the Cuttlebug to the "Embossing Heat Tool" (which is not what we call it in my scrapping group).
  To help others make heads or tails of embossing powder versus embossing plates, I'm doing an embossing series! Expect to see at least one post a week with a new embossing style (some use the same technique with a twist).
 First up is the basic heat emboss. This can be a lot of fun for first timers especially if you're using metalic embossing powder. For this technique you need a "heat tool" (seen in the far right of the first picture), embossing powder, paper, a stamp and versamark. (You can use regular ink, but versamark holds the powder better). It's better to use a stamp that has a large solid area.
 Once you've picked out your tools, stamp your image in the versamark... it won't dry too quickly, but you'll still want to be quick adding the powder. I make sure to have an extra sheet of paper (if I don't have an embossing tray handy) that I can "pour" the excess powder onto. Tap the back of your image to dislodge extra powder (and to get rid of the bits that end up outside your image). Then turn on your heat tool... give it a moment to warm up and then apply the heat to the powder. Don't get too close or you'll burn the powder or paper!
  For the record... a hair dryer does NOT work. You need lots of heat with very little airflow.
The heat "melts" the powder, it's more obvious with the metalic powders, keep your heat tool moving so you don't over do it.
This kind of embossing is great for making your own suedo embellishments. Stamp an image in one color, stamp it again on a scrap and emboss part of it, cut out the embossed part and popdot it down.
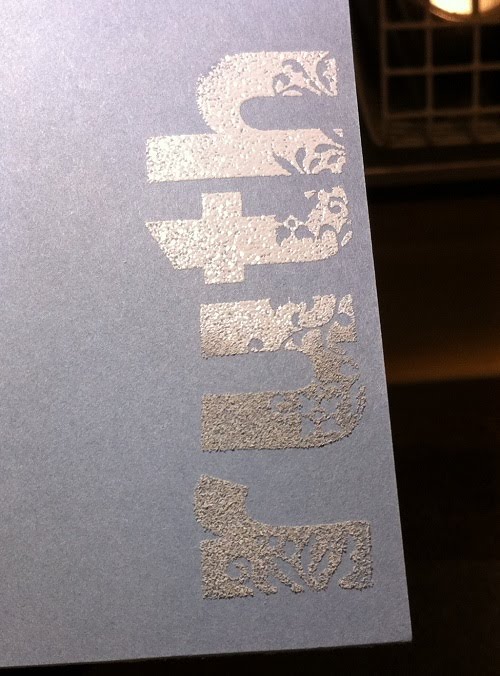 Here's an example of white embossing powder on colored cardstock, you can see how it goes from "what? that's WHITE?" to "oooh shiney white!"
Subscribe to:
Posts (Atom)